http://ubuntuhandbook.org/index.php/2015/02/share-a-folder-in-ubuntu-14-04/
https://itsfoss.com/share-folders-local-network-ubuntu-windows/
Sunday 28 January 2018
Ubuntu OpenVPN Setup for Private Internet Access (PIA)
From: https://www.privateinternetaccess.com/pages/client-support/ubuntu-openvpn
- On some distributions, you may need to run the following command before running the install script:
sudo apt-get install curl network-manager-openvpn-gnome - Enter the following command in the terminal window:
wget https://www.privateinternetaccess.com/installer/pia-nm.sh

tip: Press Ctrl+Shift+V to paste into the terminal. - Enter the second and last command:
sudo bash pia-nm.sh

- If you are prompted for your password, simply enter the password you use when you log into your computer. No stars or any character will appear: this is normal and just a security feature of the Terminal.
- The installer will ask you for your username as well as your connection method.
Simply enter your username as indicated. The next two questions are optional and you can simply press the Enter key to skip them and use the defaults.

- That's it! You can now connect to PIA using the VPN Connections menu of the networking (arrows or WiFi icon) menu.
Thursday 25 January 2018
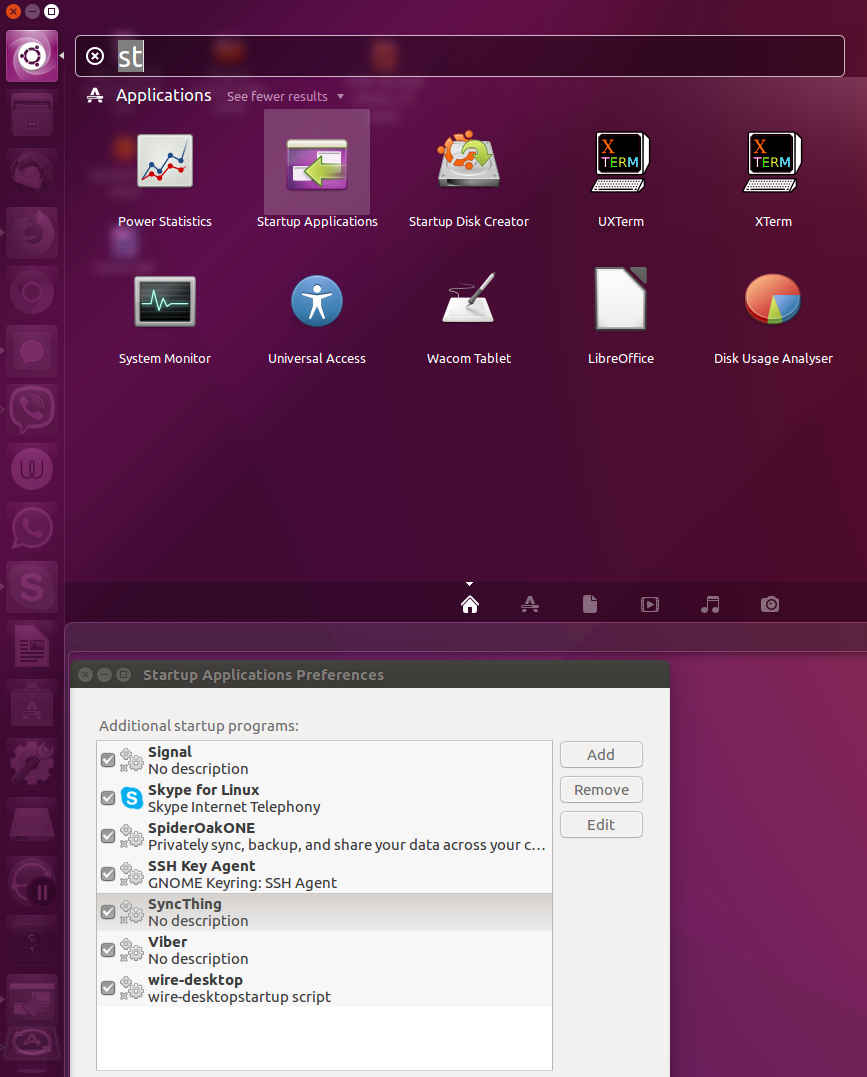
Linux Ubuntu StartUp commands to start open source messaging app Wire and messeging app Viber minimised, and to start secure messaging app Signal and SyncThing.
Linux Ubuntu StartUp commands to start open source messaging app Wire and messeging app Viber minimised, and to start secure messaging app Signal and SyncThing.
Wire command: /opt/wire-desktop/wire-desktop --hidden
Viber command: /opt/viber/Viber StartMinimized
Signal command: signal-desktop
Wire command: /opt/wire-desktop/wire-desktop --hidden
Viber command: /opt/viber/Viber StartMinimized
Signal command: signal-desktop
SyncThing command: syncthing
(also see how to install and then set up a menu icon for SyncThing here: http://flossnotes.blogspot.co.uk/2018/01/handy-app-to-sync-photos-from-android.html)
Sunday 21 January 2018
Handy app to Sync photos from Android phone to Linux Ubuntu
SyncThing for Android app: https://syncthing.net/
How to install SyncThing on Ubuntu: https://www.linuxbabe.com/ubuntu/install-syncthing-ubuntu-16-04-via-official-deb-repository
And then add it to the Ubuntu menu bar or as a link to the desktop: https://askubuntu.com/questions/31427/how-do-i-put-a-web-application-on-the-launcher
----
sudo apt-get install curl
curl -s https://syncthing.net/release-key.txt | sudo apt-key add -
If you see
echo "deb http://apt.syncthing.net/ syncthing release" | sudo tee /etc/apt/sources.list.d/syncthing.list
Update local package index and install Syncthing on Ubuntu 16.04 LTS.
sudo apt-get install syncthing
This deb repository also works on Debian or other Debian/Ubuntu-based Linux distros such as Linux Mint, Elementary OS.
Set Up Syncthing as a Systemd Service
The official Syncthing deb package ships with the needed systemd service file. Under
How to install SyncThing on Ubuntu: https://www.linuxbabe.com/ubuntu/install-syncthing-ubuntu-16-04-via-official-deb-repository
And then add it to the Ubuntu menu bar or as a link to the desktop: https://askubuntu.com/questions/31427/how-do-i-put-a-web-application-on-the-launcher
----
Install Syncthing on Ubuntu 16.04 via Official Deb Repository
Usecurl to download the Syncthing GPG key then import the key to Ubuntu system with apt-key.sudo apt-get install curl
curl -s https://syncthing.net/release-key.txt | sudo apt-key add -
-s option enables silent mode.If you see
OK in the terminal, that means the GPG key is
successfully imported. Then add official Syncthing deb repository with
the following command.echo "deb http://apt.syncthing.net/ syncthing release" | sudo tee /etc/apt/sources.list.d/syncthing.list
Update local package index and install Syncthing on Ubuntu 16.04 LTS.
sudo apt-get update
sudo apt-get install syncthing
This deb repository also works on Debian or other Debian/Ubuntu-based Linux distros such as Linux Mint, Elementary OS.
Set Up Syncthing as a Systemd Service
The official Syncthing deb package ships with the needed systemd service file. Under /lib/systemd/system/ directory, you will find a syncthing@.service
file. Enable syncthing to auto start when Ubuntu is booted up by
running the below command. Replace username with your actual username.sudo systemctl enable syncthing@username.service
The above command will create a symbolic link that points to the syncthing@.service file.Created symlink from /etc/systemd/system/multi-user.target.wants/syncthing@linuxbabe.service to /lib/systemd/system/syncthing@.service.Now we can start the Syncthing service with the following command.
sudo systemctl start syncthing@username.service
Check status
systemctl status syncthing@username.service
Output:
● syncthing@linuxbabe.service - Syncthing - Open Source Continuous File Synchronization for linuxbabe
   Loaded: loaded (/lib/systemd/system/syncthing@.service; enabled; vendor preset: enabled)
   Active: active (running) since 六 2016-06-04 17:16:20 CST; 31s ago
     Docs: man:syncthing(1)
 Main PID: 5586 (syncthing)
   CGroup: /system.slice/system-syncthing.slice/syncthing@linuxbabe.
service
    └─5586 /usr/bin/syncthing -no-browser -no-restart -logflags=0
We can see that Syncthing auto start is enabled and it’s running. Now in your Web browser’s address bar, type
127.0.0.1:8384
to access the Syncthing Web interface. You can add other Syncthing
devices and share folders with them. The default syncing folder is
~/Sync
Friday 5 January 2018
Ubuntu 16.04 - how to read external USB/Sata hard drive that has old encrypted Home folder
Ubuntu 16.04 - how to read external USB/Sata hard drive that has old encrypted Home folder
Terminal commands
To avoid permissions error:
Then:
Then follow the prompts - see screen-shot below...

Terminal commands
To avoid permissions error:
umount /run/user/1000/gvfs
Then:
sudo ecryptfs-recover-private
Then follow the prompts - see screen-shot below...

Subscribe to:
Posts (Atom)